 "The golden rule of radio: Only use enough power to complete the communication."
Basics
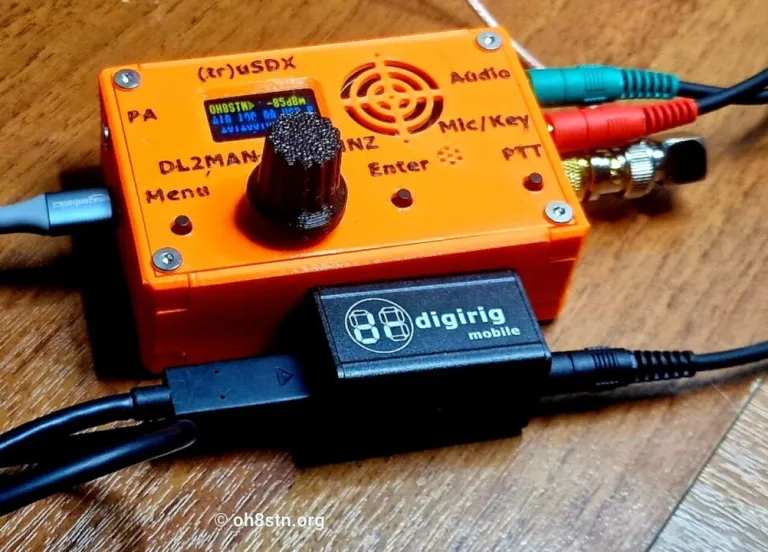
The (tr)uSDX is a compact, low-power QRP transceiver. It operates on HF bands (7-30 MHz) with power levels ranging from 0.5W to 7W, depending on the power source and configuration. It supports various modes including CW, SSB, AM, FM, and digital modes like FT8 and WSPR with recent firmware updates enabling direct USB audio for digital operation without needing a separate soundcard interface.- The latest stable and beta firmware release line for the (tr)uSDX transceiver is v2.00x (such as v2.00i for standard releases and v2.00u+ or higher for advanced beta features).
- The standard (tr)uSDX v2.00 firmware does not strictly require trusdx-txrx.py to operate normally, as it features built-in USB audio and CAT control functions.
- Getting started with Winlink on Linux Mint using a (tr)uSDX transceiver involves using the cross-platform client Pat Winlink paired with an audio interface or soundcard device.
- Key items required are Pat Winlink client, Flrig or Hamlib for radio control, and a proper audio/PTT connection (such as a Digirig or custom 3.5mm-to-USB audio setup).
- Power: The radio operates on 5V USB (limiting TX power to ~0.5W) or 12V DC
(delivering 2-7W depending on the band).
Current consumption is very low at about ~80mA on RX, and 500mA on TX @13.8V with a PA efficiency of ~85%. A 3x18650 battery pack is a common portable power solution. The (tr)uSDX features a highly efficient Class-E power amplifier. Its power output scales directly with the input voltage, peaking at around 5 watts under ideal conditions (e.g. 13.8V).- 13.8V: 5 watts output
- 12V: 4 to 4.5 watts output
- 9V - 10V: 2 to 3 watts output
- 5V (USB): 0.5to 1 watt output
- Antenna: A random wire with a 9:1 balun or an End-Fed Half-Wave (EFHW) antenna is recommended for flexibility. An EFHW cut for 40m works well for 40, 20, 15, and 10 meters without a tuner.
- CW Operation: If using Morse code, a dedicated paddle is recommended over the built-in key button for better control. The radio includes a built-in CW decoder to assist with reception.
Range(FM voice)
Range varies widely based on conditions, but typical expectations are:- Local (0-5 miles): Reliable communication with 0.5W and a simple random wire antenna, especially on lower bands (40m/20m).
- Regional (5-50 miles): Achievable with 2-7W and a well-tuned EFHW antenna, particularly on 20m during favorable conditions.
- DX (50+ miles): Possible under optimal conditions (e.g., low noise, good propagation) with 7W and a high-quality antenna, but not guaranteed.
Overall, the (tr)uSDX is best suited for local use and regional communication, with DX contacts being more of a challenge that depends heavily on conditions and antenna setup.
Digital Modes
With recent firmware updates, the (tr)uSDX can transmit and receive digital modes like FT8 and WSPR directly over USB without needing a separate soundcard interface.This makes it a versatile option for digital mode operation in a compact, portable package. To use digital modes, simply connect the radio to your computer via USB, select the appropriate audio input/output in your digital mode software (e.g., WSJT-X), and ensure the radio is configured for CAT control to allow for frequency and mode changes from the software interface.
(tr)uSDX's direct USB audio capability simplifies digital mode operation, making it an excellent choice for portable digital communications without the need for additional hardware interfaces.
1000 miles per watt
The (tr)uSDX can achieve impressive range for its power level, with reports of 1000 miles per watt under optimal conditions. This is due to its efficient design, low noise floor, and the ability to use high-performance antennas like EFHWs. While actual range will vary based on many factors, the (tr)uSDX's efficiency allows for surprisingly long-distance communication even at low power levels, making it a popular choice for QRP enthusiasts and portable operations.Software and Control
The (tr)uSDX can be controlled and programmed via its Micro-USB port, which provides CAT control and firmware update capabilities. This allows for integration with digital mode software like WSJT-X for FT8 and WSPR without needing a separate soundcard, thanks to recent firmware updates that enable direct audio over USB.
To update the firmware, use the AVR-Dudess software along with the CH340 USB driver. You can download custom firmware from the official DL2MAN website, where you will need to generate a firmware file using your radio's serial number. After flashing the new firmware, it's important to calibrate the reference frequency using an SDR or another receiver to ensure accurate CW tone alignment.
- CAT Control: Connect the (tr)uSDX to a PC via Micro-USB for CAT control and programming. This allows for digital modes like FT8 and WSPR without requiring a separate soundcard (via recent firmware updates).
- Firmware Updates: Use the AVR-Dudess software and the CH340 USB driver to upload custom firmware from the official DL2MAN website.
- Calibration: After assembly, calibrate the reference frequency using an SDR or another receiver to ensure accurate CW tone alignment.
APRS
Online tracking
Using the (tr)uSDX for APRS is typically done using High Frequency (HF) bands like 30m or 40m.
Because the transceiver lacks a built-in TNC, you must connect it to a computer or mobile device running APRS/packet software using an audio interface (e.g., Digirig Mobile) and use CAT control for PTT.
Key Requirements
Audio Interface: You will need an interface to link the radio's 3.5mm audio jacks to your computer.
Data Connection:
A separate micro-USB cable connecting the radio directly to the computer is required for CAT control.Software:
Popular setups include Direwolf for the software TNC, paired with an APRS client like APRSISCE/32 or Xastir.
Radio & Software Configuration
Configuring the (tr)uSDX requires a few specific adjustments so the software can communicate with the rig:Firmware: Ensure your (tr)uSDX is running firmware version 2.00u or newer to take advantage of CAT streaming.
Serial / CAT Settings:
In your software (e.g., Direwolf or WSJT-X), use the Kenwood TS-480 rig profile.
Port Settings:
Set the baud rate to 38400 with 8 data bits, 1 stop bit, and no handshake.
For control lines, set DTR High and RTS Low.
PTT Method:
Set the PTT method to CAT rather than relying on hardware RTS/DTR pins.
Frequencies:
Since HF APRS is not on the same standard 144.390 MHz as VHF, tune your radio to recognized regional HF APRS frequencies (such as 10.149.2 MHz on 30m or 7.083.5 MHzfor VARA APRS on 40m)
Because the (tr)uSDX is a QRP (low-power) radio with about 5W output, operating digital
modes like APRS highly benefits from an efficient, resonant antenna (like a dipole or end-fed) to effectively reach the digipeater network.
EMAIL Server (EMAIL)
The easiest way to send email is to send a message to EMAIL with the recipient's email address as the first "word" of the message.You may only send one line messages (67 total characters maximum).
              Send APRS message "email@address message text" to EMAIL.

              APRS Format: URCALL-10>APRS::EMAIL    :urname@urdomain.bogus This is a test.
Currently, EMAIL and EMAIL-2 are the callsigns for the general email servers. Others exist run by other sysops.
Both support delayed delivery of APRS messages. Both supports messaging to/from Winlink.
SMS
How to send an SMS message via APRS:- Address message to SMSGTE
- Message body:
@<message> -
Example:
@4048675309 No cell here, use radio - Sending from SMS to APRS
- Send SMS to SMS Gateway number
- Message body:
@<callsign> <message> - Example:
@KO6LVT Will contact u on 146.535
Internet Videos
KM4ACK-Linux |YAAC
Quick StartYAAC allows ham radio operators to interact with the Automatic Packet Reporting System (APRS) to track locations, monitor weather telemetry, and exchange tactical data.
Initial Configuration Summary
When launching YAAC for the first time, a setup wizard will guide you through entering your Amateur Radio Callsign and selecting your station type (e.g., mobile, fixed base, or I-Gate). To utilize the internet backbone, you will create an APRS-IS port and provide your callsign verification passcode. For local radio operations, you will establish a hardware or network port mapping to your radio's TNC.
Internet Videos/Links
KM4ACK- YAAC | KM4ACK -Setup | Mobilinkd | Digipeater Linux |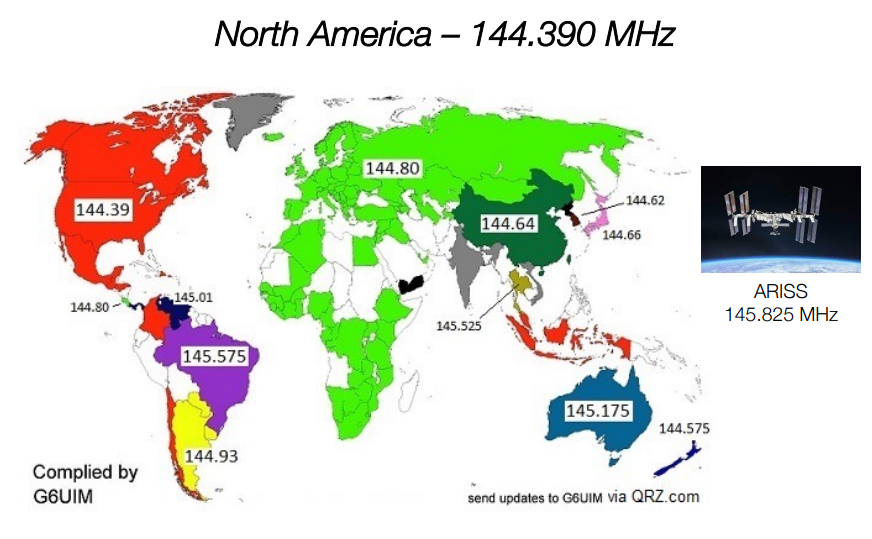
Digirig
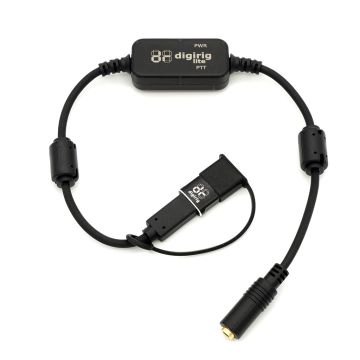
For the (TR)uSDX, there will be one cable coming from the (TR)uSDX itself, while another comes from the Digirig. This wire mess happens because the (TR)uSDX uses a USB port for CAT control. The USB port is a good thing, but without an internal audio interface on the (TR)uSDX, it inadvertently creates a wire mess situation for us. For radios with a traditional CAT control port, there will be a single cable between the Digirig and computer.
To use the Digirig with the (TR)uSDX, you will need to connect the audio output from the (TR)uSDX to the audio input of the Digirig, and then connect the Digirig to your computer via USB. The CAT control will be handled through the (TR)uSDX's USB port, while the Digirig will manage the audio signals for digital mode operation. This setup allows you to use digital modes like FT8 and WSPR with the (TR)uSDX while still maintaining CAT control for frequency and mode changes from your computer.
Overall, while the (TR)uSDX's USB CAT control adds some complexity to the setup, it also provides a modern and flexible interface for controlling the radio from your computer.
Configuration
To configure your (tr)uSDX and Digirig Mobile on Linux Mint, grant your user account serial port permissions, configure audio routing via PulseAudio, and set up your preferred digital software (e.g., WSJT-X, JS8Call) to use the Digirig's CH340 virtual serial port for PTT and USB Audio.Serial Port Permissions
Linux Mint restricts access to USB-to-serial devices by default. You must add your user to the dialout group:Open your Terminal.
Run the following command:
sudo usermod -a -G dialout $USER
sudo usermod -a -G dialout artisan
Important: Log out of your Linux session and log back in for the permissions to take
effect.Plug in the Digirig.
You should now see it listed as /dev/ttyUSB0 (or ttyUSB1) by running:
ls /dev/ttyUSB*Audio and Sound Settings
The Digirig acts as a standard USB audio device. Open PulseAudio Volume Control (pavucontrol from your menu) or alsamixer.Under the Input Devices tab, select the Digirig's USB microphone/capture device.
Under the Output Devices tab, select the Digirig's USB speaker/playback device.Tuning for (tr)uSDX: The Digirig provides a high-level audio signal. In PulseAudio or alsamixer, you may need to attenuate the output (e.g., dial your speaker playback down to around -25 dB) to prevent an overdriven, splattering signal on the waterfall.
AIOC
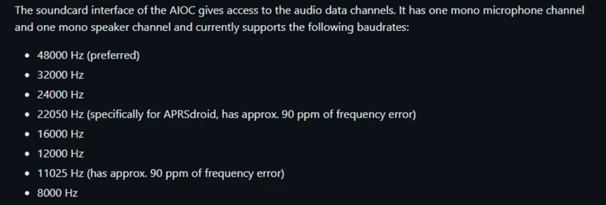
The AIOC (All-In-One-Cable) is a compact, open-source USB interface designed to simplify connecting handheld ham radios to computers for digital modes and programming. It eliminates the need for separate sound cards, programming cables, and PTT adapters by combining all three functions into a single USB-C device.
Audio adapter
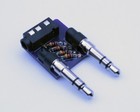
(tr)uSDX Audio Adapter for Digital Modes
Works for Android Phone/Tablet and Windows PC/Laptop
Provides 20 dB of attentuation to condition line level audio to and from the (tr)uSDX to prevent overload and distortion of signal in digital mode operation.
Plug into (tr)uSDX with resistors facing down.
Note board labels for each plug. Insert a TRRS cable into the adapter.
Connect audio cable to computer or phone TRRS combo jack, or to headphone and mic jack using a splitter.
Set (tr)uSDX volume to 10. Set computer/phone audio volume level to 100%.
To trigger PTT on transmit, either set up CAT control or use VOX mode.
Designed by K6ARK.
Firmware
To update the (tr)uSDX firmware, you will need to use the AVR-Dudess software along with a CH340 USB driver.
First, generate a firmware file using your radio's serial number on the DL2MAN website.
Then, connect your (tr)uSDX to your computer via Micro-USB and use AVR-Dudess to upload the new firmware.
After flashing, it's important to calibrate the reference frequency using an SDR or another receiver to ensure accurate CW tone alignment.
The firmware updates also enable direct audio over USB for digital modes like FT8 and WSPR without needing a separate soundcard interface, making it easier to operate digital modes with the (tr)uSDX.
After flashing, calibrate the reference frequency using an SDR or another receiver to ensure accurate CW tone alignment.
Get firmware version
To check the firmware version on your (tr)uSDX, turn the radio on and observe the OLED display during the startup sequence.The firmware version (e.g., 2.00i or 2.00u) will temporarily flash on the screen alongside your programmed callsign or serial number.
If you miss the startup screen or are running a terminal program, you can also check it via a serial connection by typing the CAT command V into your computer
If you find you are on an outdated version (such as below 2.00u, which is required for
features like audio streaming over USB), you can grab the latest software updates and flashing instructions directly from the (tr)uSDX Firmware Page.
Wine
AVR-Dudess is a Windows-only application, but you can run it on Linux using Wine. To do this, first install Wine on your Linux system. Then, download the AVR-Dudess software and the CH340 USB driver for Windows. You can run the AVR-Dudess installer using Wine, and it should allow you to flash the (tr)uSDX firmware from your Linux machine. However, keep in mind that running Windows applications through Wine can sometimes lead to compatibility issues, so it's generally recommended to perform firmware updates on a native Windows machine if possible for the best experience.Linux Mono
AVRDUDESS is a popular graphical user interface (GUI) for the command-line tool AVRDUDE, which is used to program Atmel AVR microcontrollers. While it is a Windows application, it can run on Linux by using the Mono runtime environment.To run AVRDUDESS on Linux using Mono, you will first need to install Mono on your system.
Then, you can download the AVRDUDESS executable and run it using the Mono command in the terminal. However, keep in mind that running Windows applications through Mono may not always work perfectly, and you may encounter issues with USB drivers or other compatibility problems. For the best experience, it's generally recommended to perform firmware updates on a native Windows machine if possible.
Quick Installation Guide (Ubuntu/Debian)
To get AVRDUDESS running on your Linux system, follow these steps:
Install AVRDUDE:
This is the underlying tool that does the actual programming.
bash
sudo apt install avrdude binutils-avr
Install Mono:
This allows you to run Windows applications on Linux.
bash
sudo apt install mono-complete
Download AVRDUDESS: Get the latest version from the official website and save it to your desired location.
Run AVRDUDESS: Use the terminal to navigate to the directory where you downloaded AVRDUDESS and run it using Mono.
bash
mono avrdude.exe
Note: You may need to configure USB permissions to allow AVRDUDESS to access the (tr)uSDX for firmware updates.
CAT
The CAT command set is based on the Kenwood TS-480 protocol, with some extensions for additional features. This allows for control of frequency, mode, and other settings from compatible software.
For digital modes, ensure your software is configured to use the correct COM port and baud rate to communicate with the (tr)uSDX for seamless operation.
The CAT interface also allows for remote control of the radio, making it possible to operate the (tr)uSDX from a computer or even a smartphone with the right software, providing flexibility for various operating scenarios.
Overall, the CAT capabilities of the (tr)uSDX enhance its versatility and make it a powerful tool for both traditional and digital amateur radio operations.
Supported TS-480 CAT Commands
The (tr)uSDX responds on the following TS-480 CAT commands:FA; FAnnnnnn; IF; ID; PS; PS1; AI; AI0; MD; MD0; MD1; MD2; MD3; MD4; MD5; RX; TX; TX0; TX1; TX2; AG0; XT1; RT1; RC; FL0; RS; VX;
The most important ones are:
- FA; FA00014195000; Get / Set Frequency in Hz
- MD; MDn; Get / Set Mode (1..5 = LSB, USB, CW, FM, AM)
- IF; Get transceiver status, returning Frequency, Mode only
- TX0; Set transceiver in TX (transmit) state
- TX2; Set transceiver in Tune (transmit) state (mode must set to CW)
- RX; Set transceiver in RX (receive) state
- ID; Get transceiver ID: 020 = TS-480 which is emulated by (tr)uSDX
Configuration
- Firmware Update: Use AVR-Dudess software and a CH340 USB driver to upload personalized firmware via Micro-USB. You must generate the firmware file using your serial number on the DL2MAN website.
- Critical Menu Settings: After flashing, configure these essential parameters in
the menu:
- 8.3 Ref Frequency: Calibrate using a known signal source (e.g., WWV) to zero-beat the tone.
- 8.7 LPF Config: Set to Lo, Hi, or Classic depending on the hardware filter board installed.
- 8.2 PA Bias Max: Set to 128 for BS170 MOSFETs or 160 for FDT86256 MOSFETs to ensure proper power output.
- 8.6 Rshunt: Adjust to correct power efficiency measurement errors if necessary.
Operation:
Use the Menu button to enter settings and the knob to adjust values.Double-press the tuning knob to cycle through bands, ensuring the selected band matches the installed LPF.
Hamlib
To configure (tr)uSDX with Hamlib on Linux Mint, you must emulate a Kenwood TS-480 rig because the transceiver uses this specific CAT protocol.The most robust method involves using a dedicated Python driver to create a virtual serial port and audio loopback, though direct Hamlib connection via rigctld is also possible for basic control.
Ensure your device runs the latest firmware to support reliable TX/RX switching and audio streaming over USB.
Prerequisites
- Software: Python 3.12+, git, portaudio19-dev, pulseaudio-utils (or PipeWire), and Hamlib utilities.
- Firmware: (tr)uSDX firmware v2.00u or later (required for reliable CAT/Audio streaming).
This method uses the truSDX-Linux driver to handle both CAT commands and audio streaming over a single USB cable, creating a virtual interface compatible with WSJT-X, JS8Call, and Fldigi.
           sudo apt update

sudo apt install python3 python3-pip python3-venv portaudio19-dev pulseaudio-utils git
Clone and setup
          git clone https://github.com/miltonics/truSDX-Linux.git

          cd truSDX-Linux

          chmod +x setup.sh

          ./setup.sh
Load Audio Modules
Ensure the ALSA loopback module is active (the script usually handles this, but verify):
          sudo modprobe snd-aloop

          echo "snd-aloop" | sudo tee -a /etc/modules
Execute the driver script
It will create a virtual serial port at /tmp/trusdx_cat:
python3 trusdx-txrx-AI.py --verbose
Configure Ham Radio Software
Configure your application (e.g., WSJT-X, JS8Call, Fldigi) with the following settings:- Rig Model: Kenwood TS-480
- CAT Port: /tmp/trusdx_cat
- Baud Rate: 115200
- PTT Method: CAT
- Audio Input/Output: Select trusdx_rx and trusdx_tx (ALSA) or the corresponding PipeWire devices.
Direct Hamlib (rigctld) Connection
If you only need CAT control (frequency/mode) and are handling audio separately (e.g., via sound card), you can connect directly using Hamlib's rigctld.Plug in the (tr)uSDX and identify the USB-to-serial device (usually /dev/ttyUSB0):
-
dmesg | grep tty - Start rigctld:
Launch the Hamlib daemon specifying the Kenwood TS-480 model (ID 2028 or 202 depending on Hamlib version) and the detected port:
rigctld -m 2028 -r /dev/ttyUSB0 -s 115200 - If model 2028 fails, try -m 202 (Generic Kenwood TS-480).
Configure Client Software
Point your logging or control software to the local network port created by rigctld:- Rig Model: Network Rig (rigctld)
- Host: 127.0.0.1
- Port: 4532 (default)
40 Meters
Random Wire
For operating the 40-meter band with a 9:1 UnUn, optimal and non-resonant random wire lengths are 35.5 feet, 41 feet, or 58 feet. These specific lengths prevent the wire from becoming a half-wavelength multiple on the target frequency, keeping impedance manageable for your antenna tuner.- 35.5 feet (10.8 meters) is a common choice for 40m random wire antennas, providing a good balance of performance and ease of installation.
- 41 feet (12.5 meters) is another effective length that can help avoid resonant issues while still offering decent performance on the 40m band.
- 58 feet (17.7 meters) is a longer option that can also work well, especially if you have space constraints or want to experiment with different lengths for better SWR readings.
EFHW
A 40m End-Fed Half-Wave (EFHW) antenna is a resonant, multi-band wire antenna (approx. 63-66 ft long) popular for 7-30MHz (40/20/15/10m) operation without needing a tuner, thanks to a 49:1 or 64:1 transformer.It is ideal for portable (POTA/SOTA) or restricted spaces, requiring only a single high support point.
20 Meters
Random Wire
A 20-meter random wire antenna typically ranges from 28 to 35 feet (8.5 to 10.7 meters) in length. It requires a 9:1 unun, an antenna tuner, and a counterpoise (ground wire) to safely and effectively operate across multiple HF amateur radio bands.EFHW
A 20m End-Fed Half-Wave (EFHW) antenna is a popular, compact HF antenna for 14 MHz (20m) portable operations (POTA/SOTA), typically using ~33 ft (10m) of wire and a 49:1 impedance transformer to match high-impedance ends to 50 ohms.QRP Calling Bands
| Band | CW | Phone |
|---|---|---|
| 160m | 1810 kHz 1843 kHz (EU) |
1910 kHz |
| 80m | 3560 kHz | 3985 kHz 3690 kHz (EU) |
| 60m | 5346.5 kHz (Ch2) | |
| 40m | 7030 kHz 7122 kHz |
7285 kHz 7090 kHz (EU) |
| 30m | 10106 kHz 10116 kHz (ALT) |
|
| 20m | 14060 kHz | 14285 kHz |
| 17m | 18096 kHz | 18130 kHz |
| 15m | 21060 kHz | 21385 kHz 21285 kHz (EU) |
| 12m | 24906 kHz | 24950 kHz |
| 10m | 28060 kHz | 28385 kHz 28365 kHz (EU) |
| 6m | 50060 kHz | 50185 kHz |
| 2m | 144060 kHz | 144285 kHz |
| EU=Preferred frequency in Europe. Digital modes are generally at higher end of usual frequencies. Note that these are generally preferred QRP calling frequencies. |
||