ToughBook CF-31
For ham radio EmComm field work reconditioning a used Toughbook 31 with Linux Mint Xcfe can be done for under $400.In 2026 a new Toughbook 40 base unit retails with shipping for around $5,100 out the door. With upgrades the cost exceeds $6,500.
As of June 2026 I offer CF-31 units reconditioned, loaded with emcomm software and tested starting at $350 +$18 shipping. As-is, no refunds.
These units are an excellant choice for POTA and off grid emergencies. Built for harsh environments, its primary draw for hams is its massive, sunlight-readable screen, built-in serial ports for rig control, and resilience against drops, rain, and freezing temperatures. For SOTA you have to consider the Toughbook CF-31 8 pound weight.
Keys
Screen Brightness - FN->F1 Down, FN->F2 UpSound Volume - FN->F5 Down, FN->F6 Up
Distros - good audio, touch screen
 Mint 22.3 Xfce (preferred)
 MxLinux 25.1 Xfce
Bluetooth
Paired LC-B41 Earbud on Mint 22.3 XfceRepo
To get latest source for localhost:
Before you pull from git, wipe your current localhost
Backup /var/www/html
Thunar del html folder
Open terminal. Nav to /var/www/html.
git clone https://github.com/koglvt/toughbook.git .
If you prefer I can provide a zip file you can use to update your localhost.
Install
Below script does it all. Skip JS8Call. Set JS8Call-2.5.2-x86_64.AppImage in site bin folder to run as a program(Executable)
git clone https://github.com/km4ack/73Linux.git $HOME/73Linux && bash $HOME/73Linux/73.sh
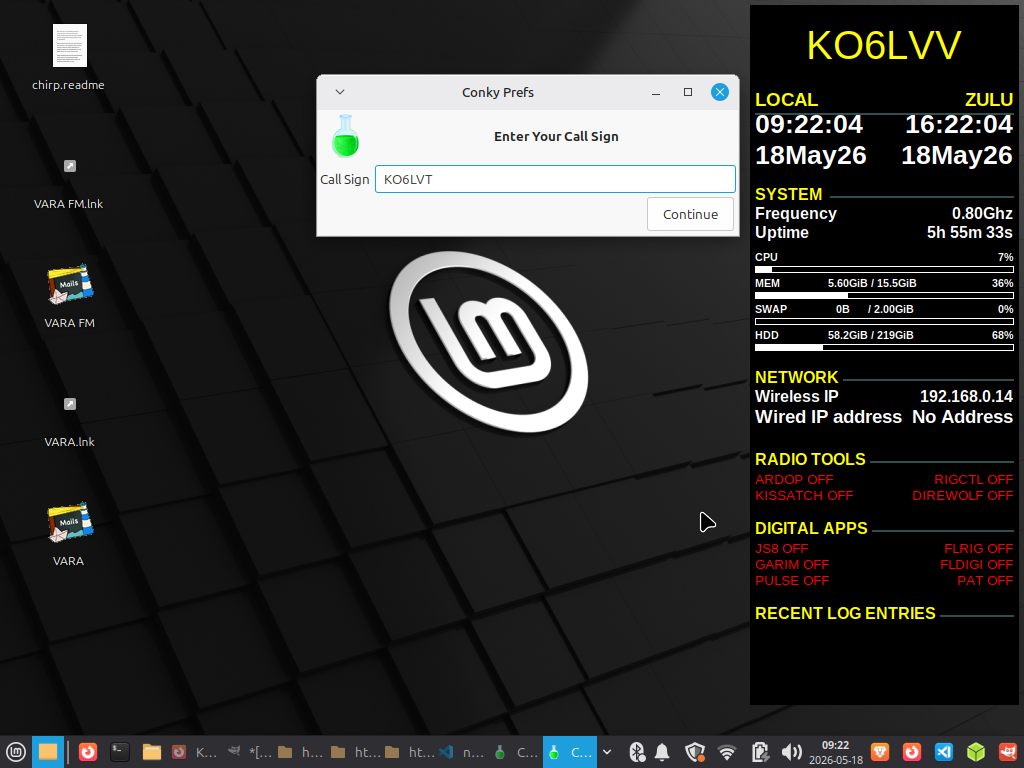
Change Conky Callsign
Hamradio->Conky PreferencesEnter your callsign->Continue->Select default->Load config
Settings
Callsign
To change to your callsign for this reference localhost web site:Open terminal: Ctrl->Alt-t
Enter
changecallsignRevise the callsign variable to your callsign.(Be sure to use quotes)
const callsign = "KO6LVT";
Save the file and exit the editor (Ctrl + O, Enter, Ctrl + X in nano). Close the terminal and clear your browser cache(Ctrl->r) to see your callsign updated in the title and navbar.
Change callsign manually
Edit the const.js file in the js folder.-
Open a terminal and edit the const.js file
nano /var/www/html/js/const.js
Revise the callsign variable to your callsign.(Be sure to use quotes)
const callsign = "KO6LVT";
Save the file and exit the editor (Ctrl + O, Enter, Ctrl + X in nano). Close the terminal and clear your browser cache to see your callsign updated in the title and navbar.
Ctrl-Shift-R on most browsers.
RTL-SDR
Shenanagins
All the below is most likely not neccesary.Just plug your RTL-SDR in one of the rear usb 2.0 plugs and fire up your SDR app of choice.
Turns out that plugging and unplugging your doggle creates unclosed binarnies that break stuff,
If things aren't working, leave the dongled pluggged in and reboot.
This clears the OS.
If not working after reboot with dongle plugged in in back port ...
To get your RTL-SDR Blog V4 working on a Panasonic Toughbook CF-31 running Linux Mint, you must purge generic drivers and build the customized Osmocom V4 drivers.-
You cannot use the default repository drivers.
The RTL-SDR V4 requires a newer, modified driver branch containing the necessary upconverter and tuner logic.
Follow this complete step-by-step pipeline to purge conflicting TV drivers, compile the V4 drivers, and get your software running.
-
1. Purge Old Drivers
Standard Linux repositories distribute an older driver branch that will cause the V4
to output only static or fail entirely.Open your terminal.
Remove any pre-installed RTL-SDR packages.
            sudo apt purge ^librtlsdr

            sudo apt autoremove
-
2. Install Build Dependencies
You must compile the official RTL-SDR Blog V4 Drivers from source.
Install the required build tools first:
            sudo apt update

            sudo apt install libusb-1.0-0-dev git cmake pkg-config build-essential
-
3. Clone and Build the V4 DriverExecute these commands sequentially to clone the correct driver
branch, compile it, and install it to your system:
            git clone https://github.com/osmocom/rtl-sdr

            cd rtl-sdr-blog

            mkdir build

            cd build

            cmake ../ -DINSTALL_UDEV_RULES=ON

            make

            sudo make install
-
4. Reload Rules and Blacklist TV DriversLinux Mint will mistake your SDR for a generic USB DVB-T television
dongle and block access to it.Copy the hardware rules to your system:
sudo cp ../rtl-sdr.rules /etc/udev/rules.d/
-
5. Blacklist the default kernel TV module by creating a configuration file:
echo "blacklist dvb_usb_rtl28xxu" | sudo tee /etc/modprobe.d/blacklist-rtl.conf
-
Reboot your Toughbook CF-31.
-
5. Verify the Connection
Plug your RTL-SDR V4 into a USB port. Test if the system
initializes the hardware correctly by running:
rtl_test
GQRX
Linux Mint 22.3 Cinnamon provides native support for RTL-SDR devices, as the underlying Ubuntu base includes the necessary drivers and kernel modules. The most critical requirement is ensuring the RTL2832U chipset is supported; while RTL2832U dongles work out-of-the-box, older or specific IT9135 or AF9033 chipsets often lack the required direct-sampling mode and are incompatible.
Working !!
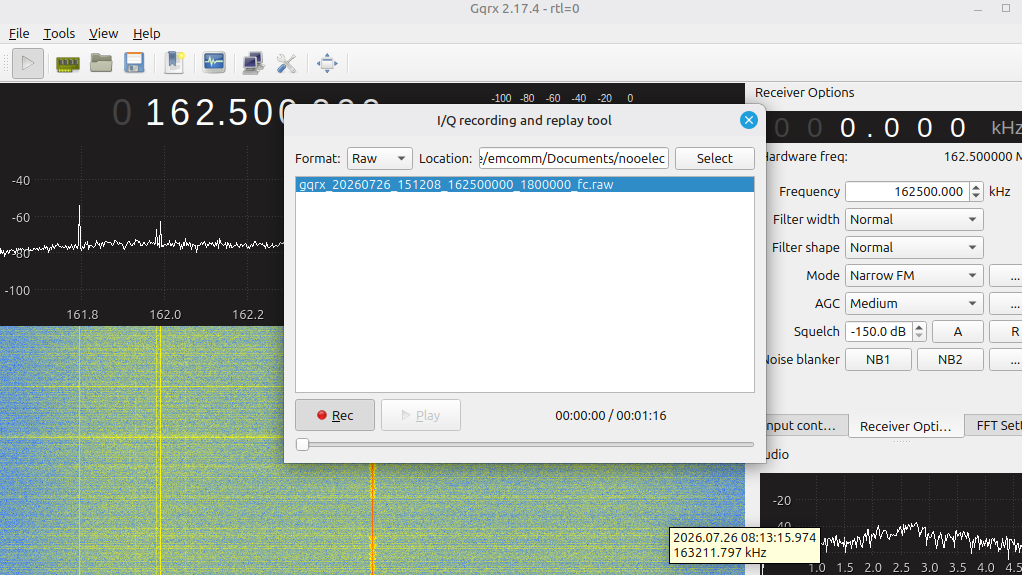
Plugging and unplugging nooelec does not deref libraries
Plug nooelec in usb port on back of ToughbookReboot
gqrx -r
Recording
- Download
- Open gqrx
- Open record\play
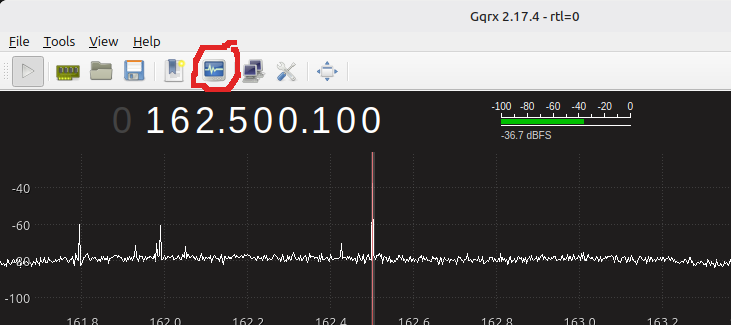
- Select
- Play
gqrx -r
Output:
          Using device #0 Nooelec NESDR SMArt v5 SN: 38419778

           usb_claim_interface error -6
The error libusb_claim_interface error -6 (LIBUSB_ERROR_BUSY) occurs because the
USB device (device 2.1) is already claimed by an active Linux kernel driver or
another application instance. The warning [libusb_exit] device 2.1 still
referenced indicates that the application exited without properly releasing the
interface, leaving the driver bound to the device.
groups
Output:
emcomm adm tty uucp dialout cdrom sudo audio dip www-data plugdev users lpadmin sambashare
      lsusb | grep -i dVB

      Output

      Bus 002 Device 072: ID 0bda:2838 Realtek Semiconductor Corp. RTL2838 DVB-T
ls -l /dev/bus/usb/002/072

    Output:

    crw-rw----+ 1 root plugdev 189, 199 Jul 26 07:54 /dev/bus/usb/002/072
            # Download the official rules file
wget -O /tmp/rtl-sdr.rules https://raw.githubusercontent.com/osmocom/rtl-sdr/master/rtl-sdr.rules

# Move to the udev directory
sudo cp /tmp/rtl-sdr.rules /etc/udev/rules.d/99-rtl-sdr.rules

# Reload udev rules and trigger them
sudo udevadm control --reload-rules
sudo udevadm trigger
The error usb_claim_interface error -6 indicates that the kernel driver
dvb_usb_rtl28xxu is blocking access to your RTL2832U OEM USB dongle. To resolve this on Linux Mint, you must blacklist the conflicting driver:
echo 'blacklist dvb_usb_rtl28xxu' | sudo tee --append /etc/modprobe.d/blacklist-dvb_usb_rtl28xxu.conf
Note: Some setups also require blacklisting rtl2832 and rtl2830. If the above
alone fails, append them:
echo -e 'blacklist dvb_usb_rtl28xxu\nblacklist rtl2832\nblacklist rtl2830' |
          sudo tee /etc/modprobe.d/rtl-sdr-blacklist.conf
Update Initramfs (Optional but Recommended) On some Mint/Ubuntu versions,
updating the initial ram filesystem ensures the blacklist is applied early
in the boot process:
sudo update-initramfs -u
On Linux Mint 22.3, the directory /usr/share/rtl-sdr typically does not exist because
modern RTL-SDR installations place configuration files, examples, and scripts in
/usr/local/share/rtl-sdr or /usr/share/rtl-sdr is only created if you manually
install specific
legacy packages or run the make install step from source without the correct prefix
If you are following a guide that references this path, it is likely outdated or
refers to the source installation directory. Here is how to resolve missing files
or paths:
Users typically install Gqrx, SDR++, or CubicSDR via the default repositories or Flatpak for a graphical interface. In modern Mint versions, manual udev rule configuration and driver blacklisting are frequently unnecessary, as the system handles device detection automatically. If a dongle is not recognized, verifying the chipset with lsusb and checking for conflicting DVB-T drivers via lsmod remains the standard troubleshooting step.
To ensure you are not forcing Direct Sampling on the Nooelec NESDR SMArt v5 (RTL2832U), you must keep the sampling mode set to normal (I-branch) in your SDR software (such as SDR#, SDR++, or GQRX). Direct Sampling is a specific mode used to bypass the tuner for HF reception below 24 MHz; forcing it while trying to receive VHF/UHF frequencies or when using the standard R820T2 tuner will result in no signal or poor performance, as the device is designed to use the internal tuner for frequencies above ~25 MHz.
- Software Settings: In SDR#, do not check the "Direct Sampling" box. In SDR++, ensure the device string does not contain direct_samp=Q or direct_samp=1. In GQRX, do not add direct_samp=2 to the device parameters.
- Hardware Configuration: The Nooelec V5 uses the R820T2 tuner for standar d operation. Forcing Direct Sampling bypasses this tuner and the low-noise amplifier (LNA), which is only intended for specific low-frequency HF use cases.
- Correct Usage: For frequencies above 25 MHz, always use normal tuning. Only enable Q-branch Direct Sampling if you specifically intend to receive Shortwave (HF) signals below 24 MHz without an upconverter.
-
Direct sampling is disabled when direct_samp=2 is omitted from the GQRX device parameters
-
Standard Operation: Without this parameter, the RTL-SDR dongle operates in its default mode, which is typically limited to VHF/UHF frequencies (above ~24 MHz).
-
HF Reception: To receive HF signals (below 24 MHz) using the Q-channel, you must explicitly add direct_samp=2 to the device string (e.g., rtl=0,direct_samp=2).
-
Alternative Values: Depending on the specific driver installation, some systems may require direct_samp=1 (I-channel) or direct_samp=3 for HF direct sampling.
-
sudo apt-get install gnuradio gr-osmosdr rtl-sdrBlacklist dvb_usb_rtl28xxu
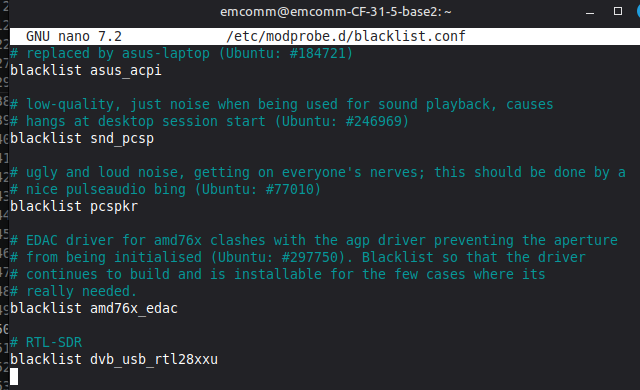
sudo nano /etc/modprobe.d/blacklist.conf
lsmod | grep rtl
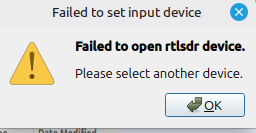
ls -l /dev/swradio0 Linux Mint 22.3 GQRX nooelec failed to open rtlsdr device
The failure of GQRX to open Nooelec RTL-SDR devices on Linux Mint is primarily caused by the kernel driver (dvb_usb_rtl28xxu) claiming the USB interface or missing udev permissions.
            rtl_test
Found 1 device(s):
  0:  Nooelec, NESDR SMArt v5, SN: 38419778

Using device 0: Generic RTL2832U OEM
Found Rafael Micro R820T tuner
Supported gain values (29): 0.0 0.9 1.4 2.7 3.7 7.7 8.7 12.5 14.4 15.7 16.6 19.7 20.7

22.9 25.4 28.0 29.7 32.8 33.8 36.4 37.2 38.6 40.2 42.1 43.4 43.9 44.5 48.0 49.6
[R82XX] PLL not locked!
Sampling at 2048000 S/s.
While the Linux SDR API was committed to the media tree in February 2014 for inclusion
in kernel 3.15, it does not block access to RTL-SDR devices; rather, it provides a
standardized kernel driver for them.
The kernel creates a specific device node, typically /dev/swradio0, for SDR functions,
distinct from the /dev/dvb/adapter0/frontend0 node used for DVB-T television reception.
Users can utilize both DVB-T and SDR functionalities on RTL2832U based sticks, but they cannot operate simultaneously because the device's hardware resources are shared. Accessing the SDR capabilities via the kernel API allows applications to run without root privileges and offers standard streaming methods, whereas traditional librtlsdr tools like rtl_sdr or rtl_tcp interact directly with the hardware via USB.
RFAnalyzer-Android
Works on cellphoneDocs
Sound
- Debug sound:
- Open terminal(Ctrl-Alt-T)
-
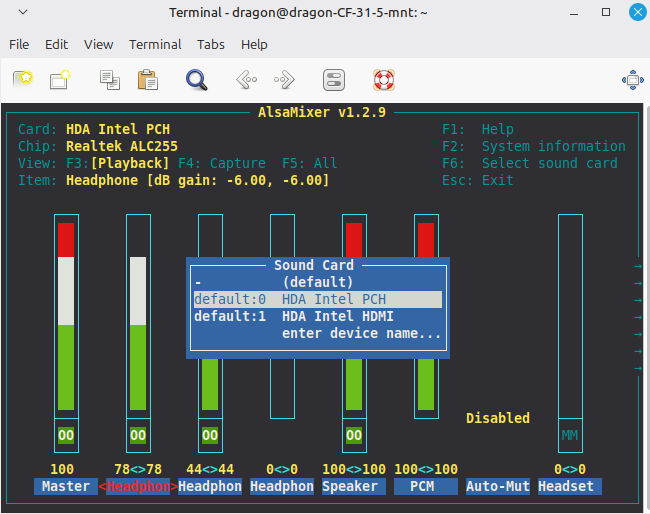
alsamixer -
F6 Select Sound Card
-
Card s/b HDA Intel PCH
Verify no "MM"
Make sure Headphones have sound Volume turned up
and a 32-bit format (S32_LE), as these are the most reliably supported by the CF-31's Intel HDA audio hardware.
The key steps are:
Verify Hardware Support:
Use cat /proc/asound/card*/codec#* or
aplay -D hw:X --dump-hw-params /dev/zero (replace X with your card number) to confirm the supported sample rates and formats.
The CF-31's audio typically supports S16_LE and S32_LE, but not S24_LE.
Set the Profile: Ensure the correct audio profile is active. For full duplex SDR work, use
pactl set-card-profile alsa_card.pci-0000_00_1b.0 output:analog-stereo+input:analog-stereo.
/usr/share/alsa-card-profile/mixer/paths
analog-output.conf |
GPS
To determine if your Panasonic Toughbook CF-31 has GPS, you can check the BIOS settings.Check the BIOS:
Restart the Toughbook and press F2 when the Panasonic logo appears.
Navigate to Advanced and select the Network submenu.
Look for a GPS option; if it is listed as "Installed" or "Enabled," the hardware is present.
tty port
dmesg | grep tty
gpsd
gpsd is the standard Linux service for translating raw NMEA GPS coordinates into readable data.
sudo apt update && sudo apt install gpsd gpsd-clients libgps-dev
Edit gpsd config
sudo nano /etc/default/gpsd
Values
        START_DAEMON="true"

        USBAUTO="false"

        DEVICES="/dev/ttyUSB0"  <-- (Replace this with the correct tty port from
         dmesg)

        GPSD_OPTIONS="-n"
Directory Listing
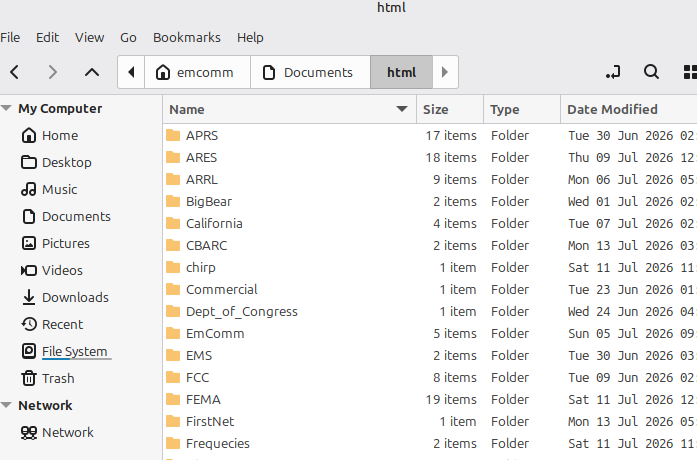
I have a python script that loads an html server on boot.Use
-
Launch your Brave browser
http://localhost:8011
To Add files:
Copy to /home/emcomm/Documents/html and refresh your browser.
Tip: Adding a directory named for the category will make it easier to locate your reference info
Note: As 07/24/2026 there are about 100,000 reference files.
Purpose is to have an offgrid reference library (No internet required)
Models |
Bias Tee
The primary warning for the RTL-SDR Blog V4 bias tee is that you must not connect it to a DC short-circuited antenna unless an LNA (Low Noise Amplifier) is placed between the antenna and the dongle.While the circuit includes thermal self-resetting fuses and overcurrent protection, leaving the bias tee on while short-circuited for an extended period (days) can permanently damage the LDO or fuse.
Key safety and usage guidelines
- Safe Configuration: The correct setup is DC Short Antenna → LNA → Coax → V4 (Bias Tee ON). This ensures the LNA protects the dongle from the short circuit.
- Power Limits: The V4 bias tee provides 4.5V and can continuously pull up to 180 mA.
- Driver Requirement: The software-controlled bias tee only functions if you are using the official RTL-SDR Blog drivers; standard generic drivers will ignore the bias tee settings.
- Clones: Be aware that many counterfeit V4 clones lack a functional bias tee and may use inferior components, leading to higher noise floors or hardware failure.
Online Reference
v4 Users GuideSDR++
Shananagins
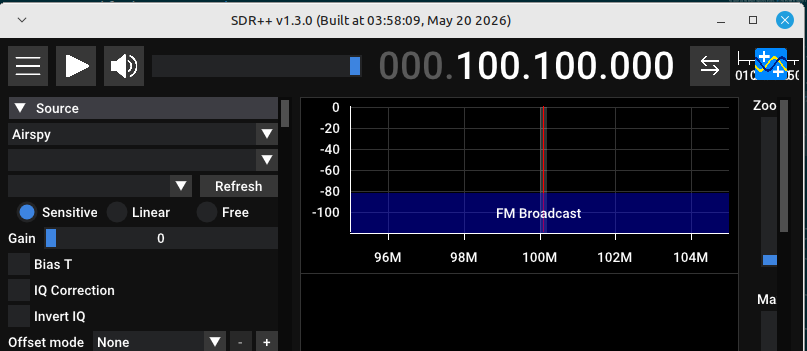
After much struggle, turns out the SDR++ .deb install is pretty much plug and play.Tip: Linux Mint uses "sdrpp_ubuntu_noble_amd64.deb". After download,right-click and install with "Package Installer"
Tip:Dongles can get quite hot. If you are not using it best to unplug from port.
Simply plug your RTL-SDR dongle in one of the rear USB 2.0 ports in your Toughbook
Tip: Linux Mint 22.3 can cause problems if you repeatedly plug and unplug your dongle.
Leave your dongle plugged in and reboot to get a fresh boot.
Users Guide | Manual |
Linux Mint 22.4 Wilma needs the unbuntu noble release, ie - sdrpp_ubuntu_noble_amd64.deb
Copy from Downloads to Tmp to avoid install errors(permissions issue) ..
radio@radio-cf31wbp50lm:/tmp$ sudo apt install ./sdrpp_ubuntu_noble_amd64.deb
Initial Steps
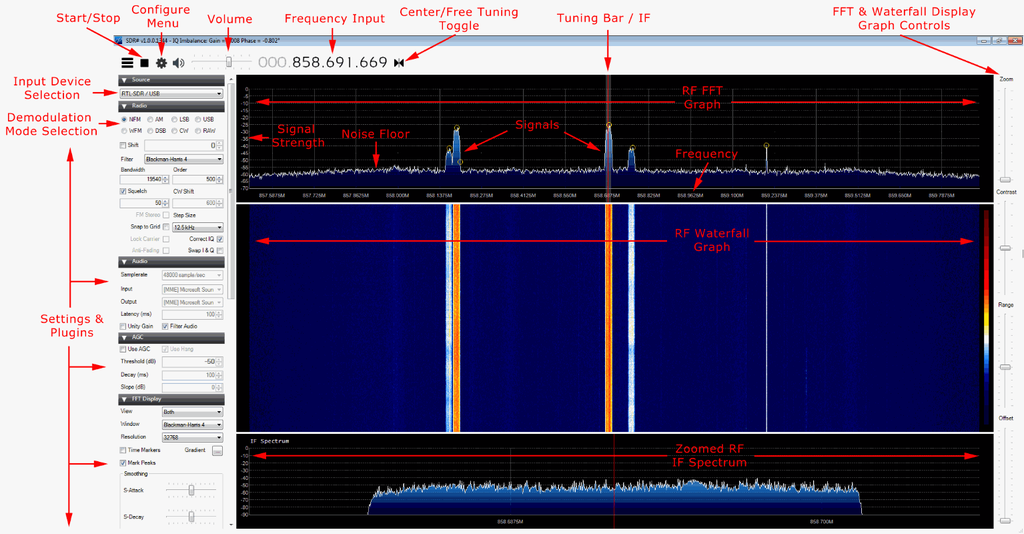
- Increase the RF gain from zero to a higher value in the configure menu.
- Reduce the range slider on the right of the SDR# window to about -70 (for RTL-SDR dongles).
- Enable the “Correct IQ” setting to remove the center spike if using an R820T/R820T2, or enable “Offset Tuning” in the configure menu if using an E4000/FC0012/13.
- Turn off the “Snap to grid” setting, or adjust the PPM offset accordingly.
- Set the 'Mode' to the correct setting for the signal that you are listing to.
Screen Layout
Dependancy Problems
Install failsdpkg: dependency problems prevent configuration of sdrpp:sdrpp depends on libfftw3-dev; however: Package libfftw3-dev is not installed. sdrpp depends on libglfw3-dev; however: Package libglfw3-dev is not installed. sdrpp depends on libvolk-dev; however: Package libvolk-dev is not installed. sdrpp depends on librtaudio-dev; however: Package librtaudio-dev is not installed. |
Fix
sudo apt install -y libfftw3-dev libglfw3-dev libvolk-dev librtaudio-dev
|
TroubleshootingNo SoundVerify usb connectionrtl_test
lsusb
aplay -lSDR++ does not use PulseAudio for its own audio output; it relies on PortAudio (or RtAudio) to manage sound devices. If you are experiencing "no sound" or device recognition issues on Linux, switching to PipeWire is often recommended over PulseAudio due to better compatibility, but the primary fix for SDR++ audio is usually within the software's module manager. Blacklistsudo nano /etc/modprobe.d/blacklist-rtl.conf sudo nano /etc/modprobe.d/blacklist-rtl-sdr.conf
     blacklist dvb_usb_rtl28xxu
     blacklist rtl2832
     blacklist rtl2830
     blacklist rtl2838
SDR++ recognition issues on Linux Mint with NooElec dongles (e.g., NESDR SMArt v4/v5) typically stem from driver conflicts, missing dependencies, or USB power/hardware faults. Kernel Driver Conflicts: Linux Mint often loads the dvb_usb_rtl28xxu driver for DVB-T TV tuners, which blocks librtlsdr. You must blacklist this module by adding blacklist dvb_usb_rtl28xxu to /etc/modprobe.d/blacklist.conf and rebooting. If lsmod | grep dvb returns nothing, the drivers are not loaded, and you can proceed to software configuration. Verify blacklisting: Run lsmod | grep -c dvb_usb_rtl28xxu; it should return 0. If it returns a number greater than 0, the module is still loaded must be removed with sudo rmmod dvb_usb_rtl28xxu. Install SDR packages: Ensure rtl-sdr, gr-osmosdr, and gqrx are installed via the package manager or by building from source if the version in the repository is outdated. Gqrx relies exclusively on gr-osmosdr as its hardware abstraction layer to interface with supported SDR devices. This architecture means that Gqrx does not directly communicate with radio hardware; instead, it depends on gr-osmosdr to detect and manage devices such as RTL-SDR, HackRF, Airspy, and SDRplay. Terminal: Run the command dpkg -l | grep gr-osmosdr. If installed, the output will show the package name and version (e.g., ii gr-osmosdr). If the command returns no output, the package is not installed. To ensure GNU Radio recognizes RTL-SDR devices, you must install gr-osmosdr, as there is no separate RTL-SDR source block in GNU Radio; the osmocom source provided by this package allows access to the dongle as an IQ source. If you install the RTL-SDR hardware after gr-osmosdr, you must re-run cmake, make, and make install for gr-osmosdr to detect the library. Additionally, you should blacklist the default Linux drivers (e.g., dvb_usb_rtl28xxu) and run sudo ldconfig to resolve conflicts. Audio Configuration If the device is detected but produces no audio, the issue usually lies with the PulseAudio or ALSA configuration. Check the PulseAudio Volume Control playback tab to ensure the correct output device is selected. Inside GQRX, verify that the Audio Gain is set to 0 or lower (not LNA gain) and that the demodulation mode is not set to "demod off."
  sudo usermod -aG plugdev $USER
  sudo usermod -aG dialout $USER
  group
emcomm adm tty uucp dialout cdrom sudo audio dip www-data plugdev users lpadmin sambashare The Nooelec V5 failure to open on Linux Mint 22.3 is typically caused by the default DVB-T TV driver claiming the device or a permission error. To resolve this, you must blacklist the conflicting kernel modules to allow the SDR driver to take control. Create or edit the file /etc/modprobe.d/blacklist-dvb.conf and add the following lines:
  blacklist dvb_usb_rtl28xxu
  blacklist rtl2832
  blacklist rtl2830
To install the rtl-sdr.rules file on Linux Mint, you must copy it to the udev rules directory to grant proper permissions to your dongle. If you compiled rtl-sdr from source, the file is located in the rtl-sdr-blog or rtl-sdr build directory. Run the following command in the terminal, replacing the path if your build directory differs:
sudo cp ~/rtl-sdr/rtl-sdr.rules /etc/udev/rules.d/
Gqrx fix attemptssudo wget https://raw.githubusercontent.com/osmocom/rtl-sdr/master/rtl-sdr.rules -O /etc/udev/rules.d/rtl-sdr.rulesSaving to: ‘/etc/udev/rules.d/rtl-sdr.rules’
    sudo udevadm control --reload-rules
    sudo udevadm trigger
    echo 'blacklist dvb_usb_rtl28xxu' | sudo tee -a /etc/modprobe.d/blacklist-dvb_usb_rtl28xxu.conf
    echo 'blacklist fc0013' | sudo tee -a /etc/modprobe.d/blacklist-dvb_usb_rtl28xxu.conf
Reboot Restart your system to ensure all drivers are unloaded and the new rules are active. Your RTL-SDR dongle should now be recognized by software like GQRX, SDR++, or SDRangel.
sudo rmmod dvb_usb_rtl28xxu rtl2832 rtl2830 rtl2838
        rmmod: ERROR: Module dvb_usb_rtl28xxu is not currently loaded
        rmmod: ERROR: Module rtl2832 is not currently loaded
        rmmod: ERROR: Module rtl2830 is not currently loaded
        rmmod: ERROR: Module rtl2838 is not currently loaded
Check Driver Detachment: Run lsmod | grep dvb. If dvb_usb_rtl28xxu appears, the blacklist failed or requires a reboot.
Test Connection: Run rtl_testHardware Specifics: The Nooelec V5 uses a high-quality tuner that can run hot. If the device vanishes from lsusb entirely after a few minutes, it may be thermal throttling or disconnecting. Ensure adequate ventilation or use a USB extension cable to move it away from heat sources. ALSA Audio IssuesIf the device connects but ALSA reports no audio or "dummy output," the issue is often the snd-soc-avs driver or missing firmware. Try these fixes:Disable problematic driver:
echo "blacklist snd-soc-avs" | sudo tee -a /etc/modprobe.d/soundfix.conf
1. Verify PulseAudio is Active Run the check command to confirm the daemon status. A s uccessful check returns no output and an exit code of 0.
pulseaudio --check systemctl --user status pulseaudio.service
speaker-test --channels=2 --nloops=1 --test=wav --device=default If sound plays correctly, the interface is active and no conflicting daemon is blocking audio.
pactl info | grep "Server Name"
Server Name: PulseAudio (on PipeWire 1.0.5) To resolve no sound in GQRX on Linux Mint with PulseAudio, address the following common causes: Demodulation Mode: Ensure a mode (e.g., WFM, NFM, AM) is selected; GQRX defaults to "Demod Off", which produces silence. Audio Gain: Increase the audio gain slider in GQRX’s bottom-right audio FFT tab to at least 0 or higher. PulseAudio Routing: Open PulseAudio Volume Control (pavucontrol), go to the Playback tab, and ensure GQRX is routed to the correct output device (e.g., headphones or speakers) rather than HDMI. Service Status: Verify PulseAudio is running; if conflicts exist, try restarting it with pulseaudio -k or switching to PipeWire if Mint 21+ is unstable. pactl info | grep "Server Name" |
|